
US-ION SEASONING FAQs
Seasoning: What to expect in reality
Building a low- or non-stick surface can take time and experience - don't expect the immediate slipperiness of synthetic non-sticks. Once you have developed the best seasoning method to maintain your SOLIDteknics skillets, you will continue to reap the benefits of a well-seasoned skillet: health, sustainability and performance.
Seasoned iron will rarely look visually perfect on the cooking surface, and the appearance will continue to evolve and change depending on what, and how, you’re cooking. Don’t worry about how it looks – it’s all about performance!
Can Quenched™ iron rust? Is it non-stick?
Simply put: Our new Quenched™ finish is real, natural seasoning using non-GMO, Kosher Pareve rice bran oil. It is not a synthetic coating. The Quenched™ finish protects the entire skillet from rust, and creates the foundation for a non-stick/low-stick cooking surface.
More detail: Our US-ION wrought iron skillets are made from pure, clean 100% American iron. Seasoning, cooking and good maintenance will keep rust at bay, but if the skillet is left wet, idle for long periods, or unprotected by seasoning, it will develop rust. The Quenched™ finish means we've seasoned the entire skillet for rust prevention, so your skillet is ready to cook: no oven-season needed! The Quenched™ finish also gives the cooking surface a good solid layer of seasoning, i.e. a patina and a fairly developed non-stick surface (given the correct use of heat and fat control!). If you want your skillet super non-stick, more stovetop seasoning is recommended before you start cooking- or simply build the seasoning naturally by cooking. Your seasoning and the non-stick surface will continue to change and develop - and build and get better - the more you cook!
Good to know: Acidic foods can strip the seasoning, food can stick if it's turned too soon or if the heat is too high or not enough fat is used or the pan isn't cleaned properly, etc. It can take an adjustment if you're used to cooking on synthetic coated, disposable skillets. The beauty of seasoned iron? It is forever renewable!
Rust? No problem! Here’s the remedy. Need a seasoning top-up? Follow our stovetop instructions here. For other issues that may get you "stuck", our Seasoning FAQs below will help get you back on track.
What oils can I use to season?
We recommend rice bran oil for best results, though any cooking oil or fat with a high smoke point can work well: grapeseed oil, canola oil, avocado oil, lard etc. Olive oil is not good for seasoning due to its low smoke point.
Why is my seasoning flaking off?
Flaky seasoning is an indication of a weak seasoning foundation and can be caused by: too much oil; incomplete seasoning; low temperatures while seasoning; not allowing pans to cool between seasoning layers; cooking acidic foods; boiling acidic liquids; harsh scrubbing; or, cleaning with detergents.
Flaky seasoning can be easily remedied! Scrub the skillet back to remove all the lumpy/flaky bits using fine steel wool, sandpaper or a scourer. Don't worry about scrubbing the whole skillet back - just focus on the flaking/lumpy bits. Follow up with a few quick stovetop seasons to build your seasoning back up. Follow our seasoning instructions here.
Why is my seasoning sticky?
Sticky seasoning is usually a sign of excess oil built up on your skillet. To remedy this, place your skillet upside down (ideally on the top rack) and bake at 480-500 degrees Fahrenheit for 90 minutes. When seasoning, less is more when it comes to oil application!
I’ve seasoned my pan and food is still sticking!
It can take some time to build a perfectly non-stick surface through seasoning, but it is very achievable! Iron is much more conductive than synthetic, disposable skillets, so cooking with iron can take a period of adjustment. Be patient - it’s worth it!
There are a number of variables which can affect how well your skillet and seasoning are performing, but it usually comes down to two key factors: heat control and fats.
The most common reasons food may stick:
Not enough stovetop seasoning: stovetop seasoning is what builds the low/non-stick surface. See here for instructions and videos of our recommended stovetop seasoning techniques.
Too much heat: our cookware is extremely conductive, so lower your heat - medium temperatures will become your new norm! Cold food is also a common reason food can stick, so remove ingredients from your fridge or freezer and allow them to warm to room temperature before cooking.
Not cooking with enough fats and oils: achieving non-stick cooking almost always comes down to heat and fat control; adjust your heat (see above) and adjust your fats/oils until you find the sweet spot to suit your stovetop and ingredients. Whilst your seasoning is still young, cook with plenty of fats and oils to both assist the seasoning and help to build it further.
Rough patches: stuck, carbonized food debris will act like velcro to new ingredients placed in the skillet, and is one of the main reasons new iron cooks struggle. The cooking surface must be smooth, so scrape off all food debris before cooking. Run the skillet through a couple of rounds of stovetop seasoning if the seasoning needs repair after you have scraped off the rough patches.
Not allowing the meat to come to room temperature: always bring meat to room temperature, and ensure the skillet is preheated to the correct temperature. When cooking at a higher heat, use the water test to check that the skillet is ready: sprinkle a few drops of water into the skillet - if the water dances, the skillet is ready for cooking.
Cooking acidic foods: acidic foods and liquids can erode seasoning, so are best to avoid whilst your seasoning is young. If acidic ingredients strip your seasoning, just re-season!
Having trouble with bacon? Some bacon has a high sugar content which causes gumming and sticking. TIP: start cooking your bacon from a cold skillet and allow it to cook slowly as the skillet heats, eventually cooking in its own fats.
Eggs? Eggs often stick when cooked at too high a heat and/or for too long. Use a well-seasoned skillet on low temperature for scrambled eggs, and scrape around the whole skillet gently toward the middle to avoid sticking and burning. Butter/oil should be used generously.
Scrubbing your seasoning off during cleaning: a warm skillet, hot running water and a wooden spoon/scraper are the best combination for cleaning your skillet after use. You can use a scrubbing brush but be careful not to scrub off all the beautiful black seasoning you’ve built up! Once your skillet is well seasoned, it may only need a wipe out with a paper towel. See further cleaning instructions here.
If you’ve thoroughly read through all of our instructions and are still struggling, please send us an email at info@solidteknicsusa.com explaining the issues you’re having, along with some photos. We’ll be happy to guide you through the process.
Why isn't my skillet black and shiny?
Don't worry if your skillet doesn't look perfectly black and shiny - in reality, skillets will often be patchy. Whilst a shiny black patina is achievable through continued seasoning and maintenance, it's really not necessary; don't worry about how they look, our skillets are built for performance! Here's a photo of our founder Mark Henry's workhorse skillets. They may not look 'pretty', but they still perform excellently!
Why does my skillet have rust on it?
Rust is caused by a chemical reaction known as oxidation, which occurs when iron is exposed to moisture or oxygen. In order to avoid rust, ensure your skillet is well seasoned all over by maintaining the Quenched finish through oven seasoning when needed, and keep your skillet dry when not in use.
Rust is superficial and easy to fix! To remedy, simply scrub off the rust with a scrubbing brush, steel wool or fine sandpaper. Using baking soda or vinegar may help with stubborn rust. Follow up with further seasoning to ensure your skillet has a good seasoning foundation to protect from corrosion, and make sure you dry your skillet thoroughly after each use – ideally on a warm stovetop.
My skillet has rough patches. How do I fix this?
Stuck, carbonized food debris will act like velcro to new ingredients placed in the skillet, and is one of the main reasons new iron cooks struggle. The cooking surface must be smooth, so scrape off all food debris, ideally using a wooden spatula, before cooking. Run the skillet through a couple of rounds of stovetop seasoning if the seasoning needs repair after you have scraped off the rough patches.
Why has my seasoning stripped?
The most common culprits for stripping seasoning are: acidic foods and/or liquids, such as tomatoes/tomato-based dishes, stews, curries and soups; soaps or detergents.
We understand how disappointing it can be to have your seasoning strip after all the hard work you have put into it, but the beauty of seasoned iron is that it’s forever renewable! A couple of rounds of stovetop seasoning and/or cooking with plenty of fats and oils will replenish the seasoning and have you cooking again!
Whilst your seasoning is young, the best practice is to avoid cooking liquids and acidic foods in your US-ION skillets - allow your seasoning time to build and strengthen first. With a solid seasoning, our US-ION skillets are perfectly fine for cooking with acidic liquids and foods. If you’re wanting to cook crepes in the morning and curry in the evening, it’d be best to consider two skillets - one with solid seasoning for all things nonstick, and the other for everyday curries, sauces, etc. We recommend our nöni™ range for acidic foods and liquid boiling as it does not require seasoning.
Why am I getting black specks in my food or when I wipe my skillet with a cloth?
Black specks are most often caused by: food left on the skillet, weak seasoning caused either by incomplete cleaning or too much oil applied to a dry skillet. To remedy, give your skillet a good light scrub to remove the excess build-up. Use a scourer or exfoliate with salt and a splash of oil. Rinse under hot water, and repeat if necessary. Follow up with a quick stovetop season or a good cook up using fats/oils to form a clean, solid smooth surface.
Why is my skillet not heating evenly?
Our pans are made from a single, uniform sheet of iron, and therefore not possible to have hot spots. What does vary greatly is the heat output of stovetops.
Make sure the element is well matched to the size of your skillet, as a small burner with a large skillet will result in a concentration of heat in the centre. Always begin with a low heat, to allow the skillet time to heat slowly and disperse the heat to achieve a more even heat.
How many times/how often do you need to season?
There is no hard and fast rule about how many times a pan should be seasoned. We recommend at least one oven seasoning for all over corrosion protection (ideally a few more if you’re able), followed by some stovetop seasoning to kick start your natural, non toxic, low stick surface. Cook with plenty of fats and oils, and avoid acidic foods while your seasoning is young, and your seasoning will continue to build and improve the overtime.
Some ‘seasoned’ iron cooks choose not to season at all, and just let it build up naturally through cooking. It’s really up to you!
Uh oh, my skillet went through the dishwasher. Now what?
Don't worry, it takes a lot more than a dishwasher to ruin our skillets! Just follow our rust removal instructions above to bring your skillet back to a cook-ready state.
What utensils can I use to cook on US-ION?
Unlike synthetic non-stick coatings that may get scratched if using the wrong utensils, you can use any utensils on our US-ION cookware: metal, woods, plastic or silicon.
Does iron leach into food?
There is no difference between our skillets and all iron skillets in terms of iron migration - they would all transfer similar amounts of iron under similar conditions. There have been quite detailed studies into the migration of iron from iron skillets into food: the effect is significant for bare iron with acidic foods, through to quite minimal for well-seasoned skillets and fatty foods. We’re not biochemists, and we recommend further research for anyone who is in need of more iron, or looking to avoid it.
Cooking Tips & Tricks
Preheat: Before the food is placed in the pan, ensure it is preheated to the correct temperature (remember, you don’t need a high stovetop heat to get a hot iron skillet, iron is very conductive). Many newcomers don't allow enough time for pan/oil to come up to heat, and this often causes sticking. After several generations of synthetic nonstick, most home cooks have been trained to use far too low a heat to properly sear meats, generally stewing the juices out at low temperature instead. Match your pan size to burner size as closely as possible. Avoid fast high power in small burners, especially induction, with pans of much larger base size: the concentration of heat in the centre can warp the pan unduly.
Meat: Meat tends to stick when the temperature of the pan is too low so a 'crust' is unable to form, and/or if meat is too cold (meat should always be brought to room temperature before frying). You don't need a high heat setting to get a hot pan. Choose a lower setting and wait a bit longer until you understand the relationship between your pan and the heat setting of your particular stovetop. Our pans can handle hot temperatures, though it's important to let the pan slowly preheat as exposing a cold pan to high, instant heat can cause thermal shock.
Don't attempt to move the meat too quickly - let it form a crust. Give it a little jiggle with tongs when you think it might be ready, and if it moves easily you can then lift it to check properly. If it's still stuck firm, don't move it! All this becomes much more intuitive with practice.
Do it like the chefs: quickly sear room temperature meat to seal and brown (at which point the meat will naturally release from the pan when lifted), then transfer the pan to the oven to finish baking and retain the juices. A hot, well-seasoned pan doesn't need much oil, because it quickly caramelises and seals the surface. Coarse salt/pepper dry rub helps: see https://www.youtube.com/watch?v=6ggiONseXig and https://www.youtube.com/watch?v=987wOx8HXzo
Bacon: some bacon has a high sugar content and that's what causes gumming and sticking. Because iron cooking isn't so well known in Australia, there are lots of answers on USA forums and groups and one of the good answers we recommend is this: http://www.permies.com/t/12218/cooking/Cooking-bacon-cast-iron-skillet
Fish: Fish is delicate and tends to only require cooking over low heat on most stovetops. You will, however, need to get your pan hot first, heat on medium and test its temperature by carefully moving your hand over the bottom of the pan. When you can feel it radiating heat, that’s a tell-tale sign it’s ready to cook in. Add your fat, and at this stage you may want to turn your heat down, add your fish. Let your fish cook, and the skin crisp until the pan releases it. If it's sticking, it's not quite ready to flip.
As our pans are highly conductive, it comes down to good fat and heat control and a little trial and error to find your sweet spot as all stovetops vary, and disperse heat differently.
In summary:
Pat fillets dry with a paper towel. Season on both sides with salt and pepper.
Heat your pan over medium heat. When the pan is hot, add the oil/butter.
Lower heat and let sizzle until fish is golden and caramelised around edges, about 2 to 3 minutes.
Eggs: Conversely, eggs often stick when cooked at too high heat and/or for too long. Butter/oil should be used generously. Use a well-seasoned pan on low temperature for scrambled eggs and scrape around the whole pan gently toward the middle to avoid sticking and burning. See this video for the fail-safe scrambies formed-iron and cast iron method: https://www.youtube.com/watch?v=F_5rdQjN0kg .
Potatoes: If your seasoning is young, it might struggle to manage starch without adding more fat. Potatoes sticking is fairly normal on iron unless it is very well seasoned/cooked on, more fat is used and/or very little starch is present. We do also have to resist moving our food too quickly and just allow the food to form a crust that releases the food from the pan.
Give it the time it needs to develop a natural seasoned surface through plenty of cooking in fats or spend some time doing stovetop seasoning. Turn your heat down and increase your fats until you find the happy medium.
How do I season my wok?
If you don't have a gas cooktop, it can be difficult to achieve a uniform seasoning all over your wok, as there is only a small surface in direct contact with the heat source. We recommend at least four rounds of oven seasoning for corrosion protection. Stovetop seasoning will then help you build a non-stick surface on the base of your wok, but it's unlikely you'll achieve the same seasoning on the sides. But it's no big deal! In reality, pans are often patchy - this will not affect their performance. Just get cooking! Use plenty of fats/oils, and let it build naturally as has been done for thousands of years. Ensure you dry your wok thoroughly after washing and if you do encounter any surface rust from time to time, just give it a scrub to remove and re-season in the oven or simply cook a meal with plenty of fats/oils!
It's best not to overthink it, and don't worry about how they look. Just cook, and give it a touch-up seasoning if/when required. Here's a photo of one of our team member's woks - perfectly patchy!
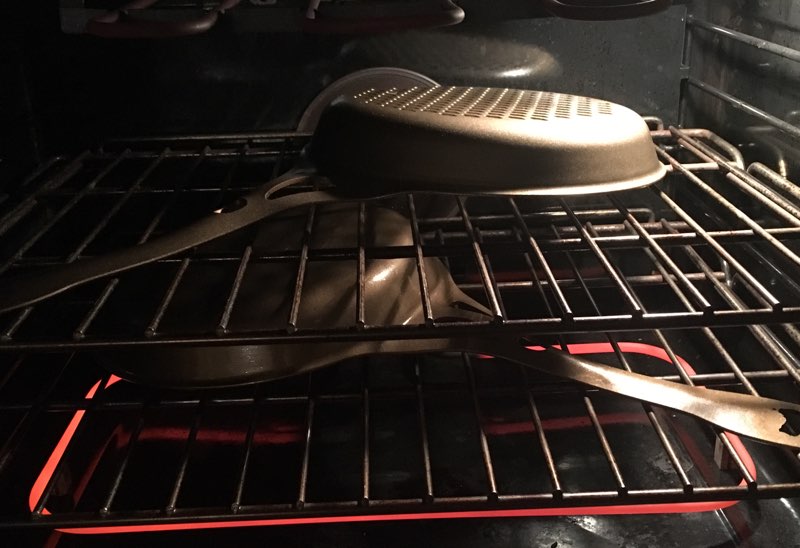
Help, my pan doesn't fit in my oven.
Our pans are designed to fit in standard 600mm ovens, however, internal dimensions of ovens can vary significantly between brands. Our full product dimensions and specifications are provided in our product listings, and we always recommend measuring your oven first. In saying that, there is a handy trick! Try spinning your pan around, so the handle is facing a back corner. This often creates enough space to enable you to shut the oven door.
As for oven seasoning, the pan does not need to sit flat. If needed, it can be propped up against a side in order to make it fit. The most important thing is that the pan is upside down.
Our noni 31cm Sauteuse in a standard 600mm oven, and 30cm AUS-ION upside down for seasoning. The oven door will not shut if the handle is sticking outwards, though spin it around so the handle is in the back corner and it fits perfectly!
How do I eliminate odour (such as fish) from my pan after cooking?
You can deodourise your pan by either heating your empty pan over low to medium heat on the stovetop for 15 minutes, or heating in a 250°C oven for 10 minutes.
Both methods will work equally well at eliminating odours. The oven method is fast and doesn’t add an undesired smell to your kitchen if your fish odour is particularly strong.
Alternatively, the below methods also work. The oven and stovetop heating methods above will not erode your seasoning whereas the below methods may:
Boil water in the pan
Use baking soda to scrub it
Simmer a white vinegar/water solution
Use lemon juice
Important: Before Use
Oven burn risk: Take care when handling any hot metal pan, especially when taken from the oven, and use oven mitts to protect your hands and trivets to protect surfaces. After removing from an oven we recommend leaving the heat sock, mitt or towel over the handle to remind yourself the handle may still be hot.
Stove burn risk: our longer skillet handles are designed to resist heat transfer up the handle, and this works so successfully that hand heat protection is normally not required. This of course does not apply to ovens, or when the handle exposed to direct heat from underneath (such as over a campfire/coals or burner). The effective 'cool handle' effect does not work for other pan models with short handles, such as the AUSfonte cast iron BIGskillet and DEEPan, or the AUS-ION 30cm duel-handled wok, although their handle designs are better than most short loop handles.
Thermal shock: warping and cracking: Beware that iron pans can be warped and cast iron has been known to crack (although we’ve never seen it in AUSfonte) due to thermal shock from heating too quickly on electric or induction cooktops set on max. Warm your pan slowly on a lower heat before increasing to higher heats. This is particularly important with induction - please read 'Induction warping' below. Thermal shock from cooling too quickly: never expose a hot pan to cold water. Thermal shock can crack cast iron or warp steel pans, no matter how thick and tough. Let your pan cool a little before washing. Like other situations of 'abuse', warped or cracked pans from thermal shock or overheating on induction are not covered under our warranty.
Induction warping: Our iron pans are so efficient with induction that heat can become too concentrated in the middle, particularly when the induction ring size is smaller than the pan size. Because our AUS-ION wrought iron pans are so efficient on induction, there is rarely any need to go above medium power settings. Small rings and high power can certainly warp any pan, and though ours are tougher than most, it is possible. The issues can be exaggerated with high power or very centrally-focused induction. Like other situations of 'abuse', warped pans from overheating on induction are not covered under our warranty.
Lid security: Please note that our style of the lid does not seal, so please be careful. When moving the pan, hold both sets of handles to secure the lid and prevent it from sliding. This is particularly important when removing hot from the oven. We recommend removing the lid first and setting it aside, before removing the base.
Oil stains: Keep in mind if your pan is oily on the base it may stain porous surfaces.
We're always here to help!
If you get 'stuck' (so to speak), and still haven't found what you’re looking for, please email us for one-on-one help from our awesome Solid service team. info@solidteknics.com
Remember: Seasoned iron is forever renewable. It's a marathon, not a sprint.
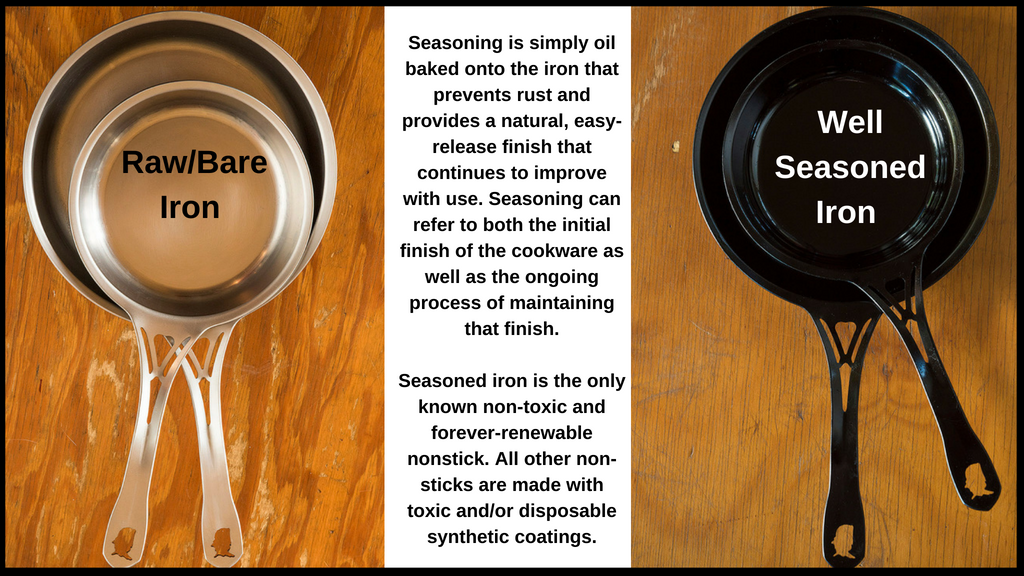
"Build Your Own seasoned, non-stick skillet, and cook with a surface you can trust. From bare iron, you can easily develop and maintain your own... "
Solidteknics USA 'best practice' seasoning method for ‘RAW’ wrought iron/steel pans.
Break the cycle of disposable synthetic imports: BYO!
Build Your Own seasoned, non-stick skillet, and cook with a surface you can trust. From bare iron, you can easily develop and maintain you own non-toxic, forever-renewable, natural seasoning. There is nothing new about seasoning - it’s been done since the age of iron - but we do have some important tips if you want to maximize your skillet’s low-stick ability and corrosion resistance. For basic instructions, read below;
““I have to admit I too was nervous about care and maintenance when I first joined this revolution. Over time I’ve come to realize my old Teflon pans were the difficult ones. Stuff up once and they’re destroyed. These pans rinse clean and need minimal day to day care. Plus they can always be returned to perfect conditions if you get it wrong.” ”
SEASONING YOUR SOLIDTEKNICS US-ION™ SKILLET
First, oven season for corrosion resistance:
As per step 7 — Place skillet upside down in oven for 1.5 hours.
Preheat your oven to 120° F / 50°C
Before seasoning can begin you will need to remove the protective natural beeswax coating via one of the two recommended methods below (a or b):
a. Melt and wipe: Preheat your oven to 80°C / 180° F (no hotter as beeswax is potentially flammable over 100°C/210° F). Place your pan upside down in the oven on a tray lined with grease-proof paper to catch drips, and heat for 10 minutes or until the beeswax has melted. Carefully remove your pan from the oven (with thick gloves/cloth – HOT!), and place on a heat-resistant surface. Wipe the pan all over with a cotton or tough paper towel to remove as much of the melted wax as possible. Wash thoroughly in warm water, and repeat the process if necessary. Note: If you use this method, you can skip 3. below.
Or, alternatively:
b. Pour boiling water all over the pan to strip the wax. Do this outside to avoid getting wax down your drain and please be careful!
Once your pan is wax-free we recommend that you ‘Key’, or roughen the surface all over to make a better micro topography for seasoning to bond to. This isn’t essential, but it can greatly improve the evenness and strength of the initial seasoning foundation layers. Abrasive pads are best for this purpose, and you can use fine sandpaper (400 or 600 grit), or fine steel wool are best to rough up the entire surface, including the base and handle. Don’t worry, you can’t damage US-ION™ - this scouring will give the seasoning better ‘grip’.
Preheat your oven to 120° F / 50°C. Place the skillet upside down in the oven, warm for 10 minutes.
Carefully remove from the oven, and place on a heat-resistant surface.
Turn oven up to 480° F / 250°C.
With a cotton or paper towel, wipe rice bran oil, seed oil, canola oil or shortening over the ENTIRE pan very thinly, so the surface appears polished (just wipe on, wipe off…..and wipe off again). The pan should look dry with no glistening pools of oil, only the merest shimmer.
Place skillet upside down in oven for 1.5 hours.
Switch off the heat and leave the skillet to cool in the oven for 30 minutes, or overnight.
Repeat steps 4-8 two or three times to establish the best seasoning foundation.
Second, stove-top season for best natural non-stick:
SLOWLY heat skillet to high on stove, drop in a teaspoon of one of the seasoning oils mentioned above in step 6 and wipe the inside surfaces with a lint-free cloth or paper towel (held in tongs for safety). Note: It is necessary to slowly heat all metals to avoid warping - we recommend warming on a lower temperature before cranking up the heat!
Continue wiping for 20 seconds as the skillet smokes.
Oil should be a very thin polish - no pools or lumps (barely visible).
Cool for at least 1 minute.
Repeat for 10-15 minutes over two or more sessions, until the base is black, slick and oil repellent.
You will now have a great foundation, but it's only the start.... don’t expect perfect non-stick from the beginning, particularly with delicate foods like eggs and fish. As with all the best iron skillets, yours will only get better with time!
Seasoning Notes:
1. While seasoning, use your oven extractor fans on high and open the windows - make sure you have enough ventilation going to avoid breathing smoke and setting off the smoke detectors!
2. If your seasoned skillet is sticky to the touch after seasoning, this is an indication that either too much oil or not enough heat/time was applied. Repeat the oven seasoning instructions above to help remedy.
3. * Avoid overheating your iron pan on the stovetop while it is empty, and allow it to cool adequately between seasoning layers. While stovetop seasoning and cooking it is important that the burner is well matched to the pan size. Iron naturally expands when heated and although our pans are carefully designed with the correct amount of concave to compensate for that movement, there may be uneven movement if you are using large pans on small, high powered / high temperature burners when the center of the pan will move a lot more than the outer edges. There may also be issues if an empty pan is left on high heat for too long and such misuse can lead to warping or deformation of the base.
4. Similarly, induction cooktops can put out a lot of heat instantly. Just as you should not put a hot pan under cold water, you should not expose a cold pan to intense, instantaneous stovetop heat (ovens are a different matter as the pan will heat uniformly). It is necessary to slowly heat pans for stovetop use, as well as correctly matching burner size to pan size, or the metal can potentially be warped (causing pans to either become spinners or excessively concave). We recommend warming on a lower temperature before turning up the heat, and never using anything higher than a medium setting with induction for iron cookware which is very conductive. Far better is to spend a little more time slowly pre-heating your pan on a lower temperature until it is hot.
COOKING WITH YOUR SOLIDTEKNICS US-ION™ SKILLET
Old-school seasoning while you cook: Continue to build your non-stick, natural, seasoning foundation by cooking with fats/oils. Acidic foods like tomato, lemon juice and vinegar can strip your seasoning. To remedy, repeat the seasoning process above.
CLEANING YOUR SOLIDTEKNICS US-ION™ SKILLET
After cooking, run the skillet under hot water.
Never place in a dishwasher - these skillets are for hand-washing only.
Use a wooden or steel scraper to remove food residue. No soap needed! Use a brush if necessary though be careful with the beautiful black seasoning you have achieved!
Wipe with a towel or paper cloth to dry while the skillet is still warm.
Place skillet on stove top and turn heat on low for a final dry, if needed.
Final notes:
Once a pan is well-seasoned, cleaning can be as easy as wiping out with a paper towel.
If your pan develops rust, gently scrub it away. Keep cooking or spend a few minutes stove top seasoning as per the instructions above.
If your seasoning works a little too hard with acidic foods or high heat, you may notice some dark residue on your towel when cleaning. This is perfectly safe and normal and will go away with regular use and care.
Enjoy the pride in building your own healthy, natural, non-stick, innovative 100% USA-made iron skillet!
We don't want you to miss all the fun going on among our wonderful Solidteknics Cookware Lovers Group members: lots of cooking, recipes, and advice for anyone new to cooking with our highly conductive seamless stainless and iron cookware.
Join us and get into the solid spirit even before you get your pans! www.facebook.com/groups/solidteknicsusers
Happy Cooking!
________________________________
Tips and Tricks
If the seasoning on your pan is sticky, this is a sign of excess oil building up and not fully converting to seasoning. To remedy this, place the cookware in the oven, upside down on the top rack and bake at 480° F degrees for 1.5 hours. Allow to cool and repeat if necessary.
Occasionally when your seasoning works a little too hard with acidic foods or really high heat, you may notice some dark residue on your towel when cleaning. This is perfectly safe and normal, and will go away with regular use and care.
If your pan develops rust, gently scrub it away and you can either keep cooking or spend a few minutes stove top seasoning as per the instructions above.
Enjoy the pride in building your own healthy natural nonstick on an innovative US iron pan that will last for many generations, with a little of this kind of care.
WHAT TO EXPECT, IN REALITY
Please don't expect Teflon™! Seasoned iron is superior in every way that really counts (health and sustainability), but will never be quite as slick or easy to wash as synthetic-coated pans even when perfectly seasoned. It will take a little maintenance and you will quickly develop your own flow. Seasoned iron will also be more 'earthy' and less visually perfect on the cooking surface. Relax! Iron pans have been that way for thousands of years, and they still haven't been beaten by corporate 'technology' marketing coatings when it comes to sustainable, non-toxic, natural non-stick!

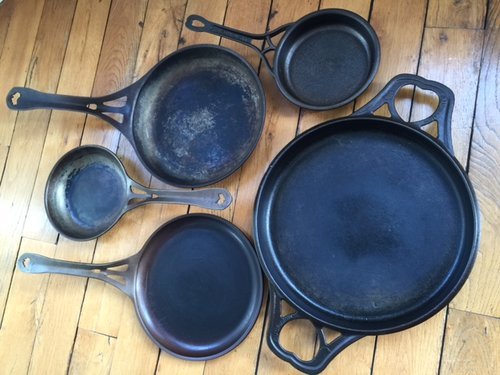
See real life Solidteknics pans below from the home collection of our founder/engineer, MJ Henry, using the same methods detailed in the above instructions. The wrought iron AUS-ION Satin crepe/griddle pan at bottom was very carefully seasoned for maximum natural nonstick: mostly used for cooking with fats/oils, and carefully washed. Its natural nonstick approaches that of the disposable synthetic-coated imports. The two AUS-ION Satin skillets top left are Mark's 'daily workhorses', and more typical of what to expect when cooking a range of foods, including acidic sauces, with some rough, rushed washing at times. There's no food stuck on: that's all good seasoning - the transformed hardened oil you must try to retain as much as possible during washing. These pans are still naturally nonstick for most cooking, and very low maintenance. Though seasoned and cleaned the same, the two AUSfonte cast iron pans (a range that has since been discontinued) on the top right aren't used quite as much as the AUS-ION skillets, and generally aren't used for acidic sauces, so they have been easier to maintain with good consistent seasoning.
Ugly, or natural? Easy or too much hassle? Chef pans hanging in restaurants can look much worse! The message is don't worry what your iron pan looks like if it works. This isn't disposable synthetic non-stick convenience, this is healthy, sustainable forever-renewable non-stick that you are responsible for yourself and can always renew if/when required. It is also a great source of pride for cooks who know they will pass on these heirloom pans, as well as the skills and love for healthy cooking, to many future generations.
SINCERELY TRIED FOLLOWING ALL INSTRUCTIONS BELOW, BUT STILL HAVING DIFFICULTIES?
For anyone new to iron pan seasoning and washing, there are a few simple common errors that can lead to weak/sticky seasoning, sticking food, rusting, etc. What to do?
♥ Email our experts directly with photos and a description of your issue: info@solidteknicsusa.com
♥ If there are still difficulties, one of our experts will call you to walk you through the issues and get you on the right course to enjoying natural seasoned iron as much as the tens of thousands of chefs and home cooks who already love their Aussie iron (and the many millions all around the world who love their seasoned cast iron and steel pans). It's easy, once you get it right!
♥ If our seasoning methods or oils don't work for you, feel free to switch and try the advice of other experts like Jeffrey B. Rogers in the USA. There are so many variables at play that no one method works for everyone, and there are many good ways to season iron.
♥ We would appreciate it if you please refrain from making frustrated social media posts before trying all of the above, and before giving us an honest chance to fix your specific problems. It is a matter of mutual respect: we have worked long and hard to produce the world's finest iron pans, acclaimed by top chefs, while pioneering a whole new Australian cookware industry against impossible odds and we continue our crusade across the US. We expect our customers to trust that we know what we’re doing, and so do the millions of iron pan users all around the world. Please do trust that we will help you correct your seasoning problems. We have little patience for trolls and haters whose first reaction is to make a damaging public post on social media. That’s very uncool! Please be patient and fair, and we guarantee to turn your personal seasoning issue into iron cooking triumph. You will have learned a new skill that means you can maintain your non-toxic non-stick iron pan for your whole life, then hand it down for many future generations of cooking love. It’s worth it! If you give up too early you will instead necessarily revert to disposing of imported non-stick pans that don’t last: potentially exposing yourself to a lot of toxic fumes, landfill and wasted resources many many times over the course of one lifetime. We firmly believe that zero waste and healthy non-toxic cooking in the same pan for generations is well worth the initial effort and learning curve that everyone new to iron cookware inevitably goes through (then forgets)! ♥ ♥
IDEAL IRON COOKING PRACTICE
· Preheat: Before food is placed in the pan, ensure it is preheated to the correct temperature (remember, you don’t need a high stovetop heat to get a hot iron pan, iron is very conductive). Many newcomers don't allow enough time for pan/oil to come up to heat, and this often causes sticking. After several generations of synthetic nonstick, most home cooks have been trained to use far too low a heat to properly sear meats, generally stewing the juices out at low temperature instead. Match your pan size to burner size as closely as possible. Avoid fast high power in small burners, especially induction, with pans of much larger base size: the concentration of heat in the centre can warp the pan unduly.
· Meat: The most common cause of stickiness with meats is searing on too low a temperature. Go far hotter than you may be used to, to quickly sear the juices and avoid stewing. You should go hotter than you're used to with other pans (it can take it), and let the pan preheat for a bit longer before adding the oil. Do it like the chefs: quickly sear to seal and brown, then transfer the pan to the oven to finish baking and retain the juices. A hot, well-seasoned pan doesn't need much oil, because it quickly caramelises and seals the surface. Coarse salt/pepper dry rub helps: see https://www.youtube.com/watch?v=6ggiONseXig and https://www.youtube.com/watch?v=987wOx8HXzo
· Bacon: some bacon has a high sugar content and that's what causes gumming and sticking. Because iron cooking isn't so well known in Australia, there's lots of answers on USA forums and groups and one of the good answers we recommend is this: http://www.permies.com/t/12218/cooking/Cooking-bacon-cast-iron-skillet
· Eggs: Conversely, eggs often stick when cooked at too high heat and/or for too long. Butter/oil should be used generously. Use a well-seasoned pan on low temperature for scrambled eggs and scrape around the whole pan gently toward the middle to avoid sticking and burning. See this video for the fail-safe scrambies formed-iron and cast iron method: https://www.youtube.com/watch?v=F_5rdQjN0kg .
CAUTION: READ BEFORE FIRST USE OF SOLIDTEKNICS COOKWARE!
·Oven burn risk: Take care when handling any hot metal pan, especially when taking from oven, and use oven mitts to protect your hands and trivets to protect surfaces. After removing from an oven we recommend leaving the heat sock, mitt or towel over the handle to remind yourself the handle may still be hot.
Stove burn risk: our longer skillet handles are designed to resist heat transfer up the handle, and this works so successfully that hand heat protection is normally not required and the pan can be lifted from stove with bare hand. This obviously does not apply to ovens or when the handle is ever exposed to direct heat from underneath (such as over a campfire/coals or burner). The effective 'cool handle' effect does not work for other pan models with short handles, such as the AUSfonte cast iron BIGskillet and DEEPan, or the AUS-ION 30cm duel-handled wok, although their handle designs are better than most short loop handles.
Thermal shock: warping and cracking: Beware that iron pans can be warped and cast iron has been known to crack (although we’ve never seen it in AUSfonte) due to thermal shock from heating too quickly on electric or induction cooktops set on max. So warm your pan a little more slowly on a medium setting for a minute on those stoves before stepping up to higher heats. On induction in particular, do not use a small 'burner' with a large pan (too much warping of any pan), and avoid settings above medium. Our iron pans are so efficient with induction that heat can become too concentrated in the middle, particularly with some high power or very centrally-focused induction. Thermal shock from cooling too quickly: never apply water to a hot pan. Apart from the risk from boiling water/steam, the thermal shock can crack cast iron or warp steel pans, no matter how thick and tough. Wait until your pan has cooled until just warm to the touch before washing. Like other situations of 'abuse', warped or cracked pans from thermal shock or overheating on induction are not covered under our warranty.
Induction warping: Our iron pans are so efficient with induction that heat can become too concentrated in the middle, particularly when mismatching induction ring size to pan size. Because our US-ION wrought iron pans are so efficient on induction, there is rarely any need to go above medium power settings. Small rings and high power can certainly warp any pan, and though ours are tougher than most, it is possible to ruin your pan through warping. The issues can be exaggerated with some high power or very centrally-focused induction. Like other situations of 'abuse', warped pans from overheating on induction are not covered under our warranty.
Lid security: Please note that our style of lid seal is not 'locking' so please be careful. The lid could slide off the base if both sets of handles are not held. This is particularly important when removing a HOT combination of base and lid from the oven. Remove the lid first and set aside before removing the base containing the food. Furthermore, the combination is potentially heavy, particularly when full of food, and most ovens have awkward retrieval angles for the spine.
Acidic foods and seasoning erosion: Until your iron pan is very well seasoned, avoid slow-cooking highly acidic food such as tomatoes, as this can strip some of the seasoning layer away and impart a metallic taste (which is harmless - it's clean and safe iron - but not ideal in taste!). For similar reasons, don't store food in your cast iron pans overnight (but certainly use their great heat-retention properties for serving on a trivet on the tabletop)!
Oil stains: Keep in mind if your pan is oily on the base it may stain porous surfaces.